Tracking OLSP Megalinks
Promoting OLSP megalinks? ClickerVolt tracks the funnel for you — opt-ins and checkout views fire automatically, with no pixel to paste and no postback to configure.
Full Video Walkthrough
https://www.youtube.com/watch?v=JNPdN_-FgFg
What's auto-tracked, and what isn't. ClickerVolt automatically tracks the opt-in and checkout-view stages of an OLSP funnel. The sale itself is not sent back by OLSP, so conversions are attributed manually in the Visitors screen. This is by design — treat OLSP opt-in/checkout-view as funnel signals and reconcile the sale yourself.
There are two things to do: flip the ClickerVolt integration on inside your OLSP account (one-time), and set OLSP as the conversion source on your ClickerVolt target (usually automatic).
Step 1 — Enable the ClickerVolt integration in OLSP (one-time)
This is what makes everything work. Without it, OLSP doesn't load ClickerVolt's script on the funnel pages and no events fire — no matter how perfectly the rest is set up.
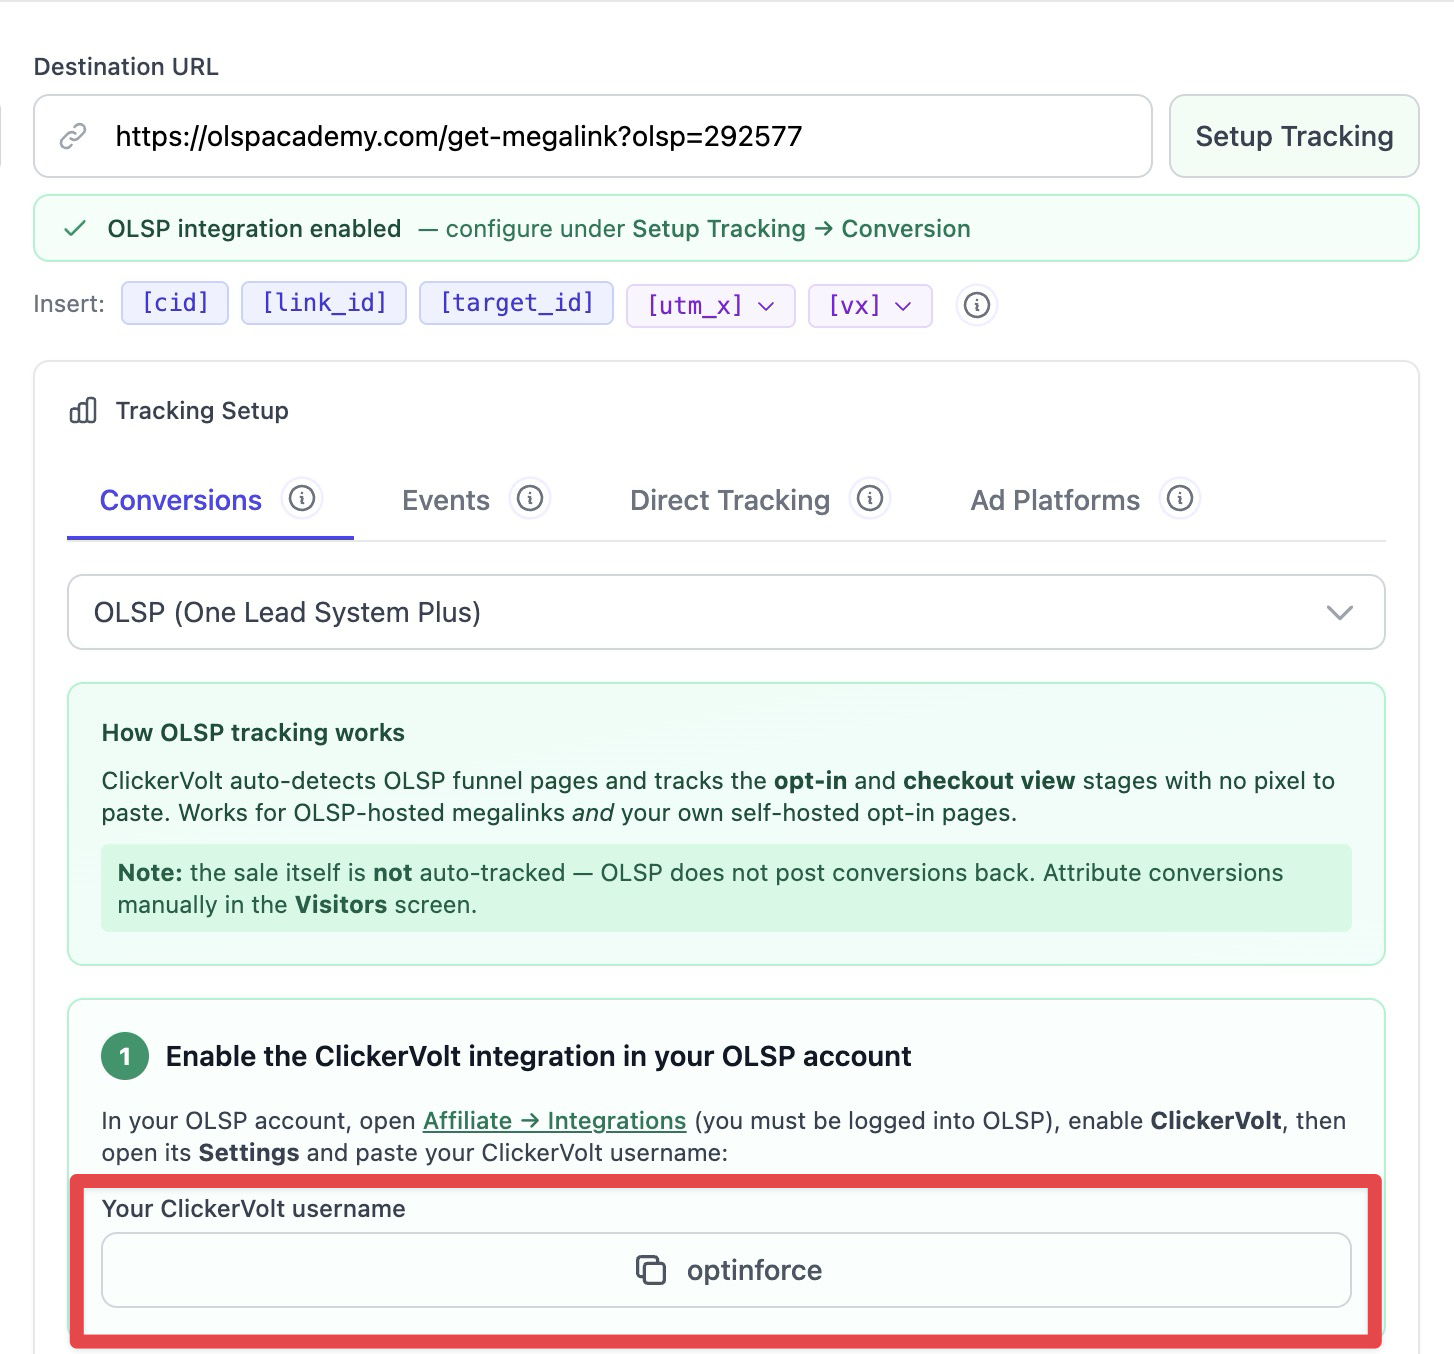
- Log in to your OLSP account and open the Affiliate Integrations page: https://olspacademy.com/affiliate/integrations (you must be logged in to OLSP to reach it).
- Find the ClickerVolt row and click the toggle on the right to turn it On.
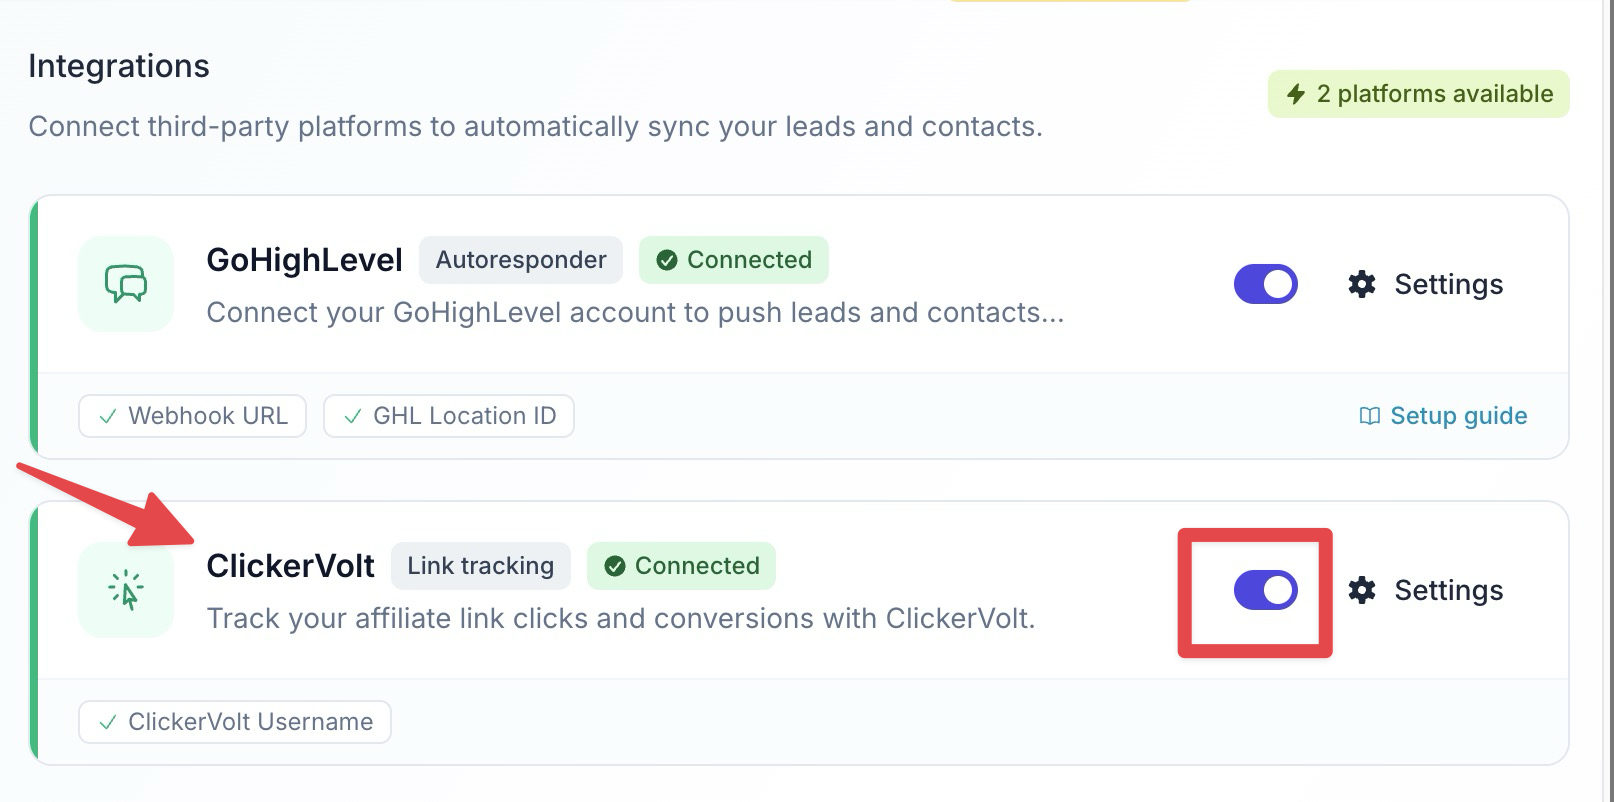
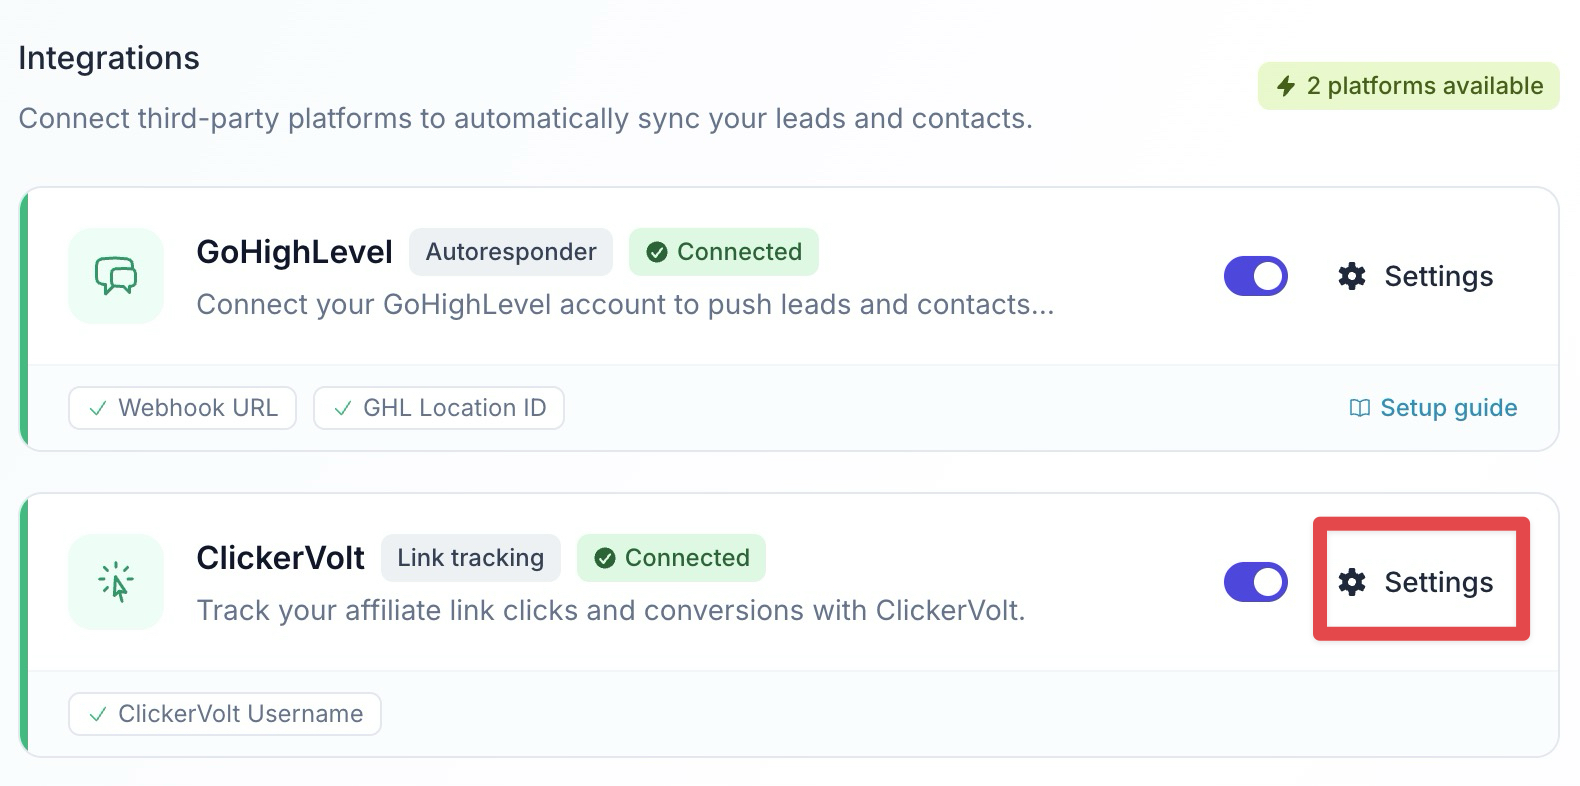
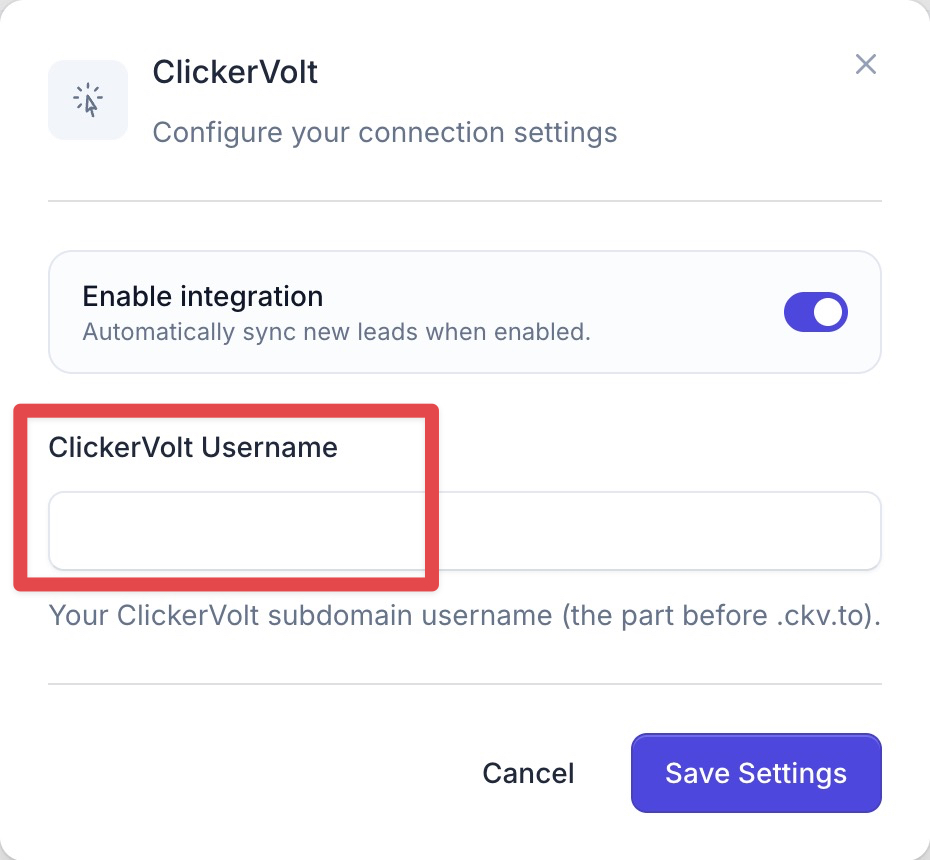
- Click the Settings (gear) icon on the ClickerVolt row.
- Enter your ClickerVolt username — the part before
.ckv.toin your ClickerVolt URLs (e.g. thealiceinalice.ckv.to). Save.
- The row should now show a green Connected badge.
You only do this once per OLSP account. Your exact username is also shown — with a copy button — directly under the OLSP conversion source in ClickerVolt (Step 2), so you don't have to hunt for it.
Step 2 — Set OLSP as the conversion source
- Open your link and click Add Target (or edit an existing one).
- If your destination is an OLSP megalink: paste it into the Destination URL field. ClickerVolt recognizes it, selects the OLSP conversion source for you, and opens the tracking panel. A small green badge — OLSP integration enabled — appears under the URL to confirm it.
- If your opt-in page is on your own domain: click Setup Tracking, open the Conversion tab, and choose OLSP from the conversion-source list.
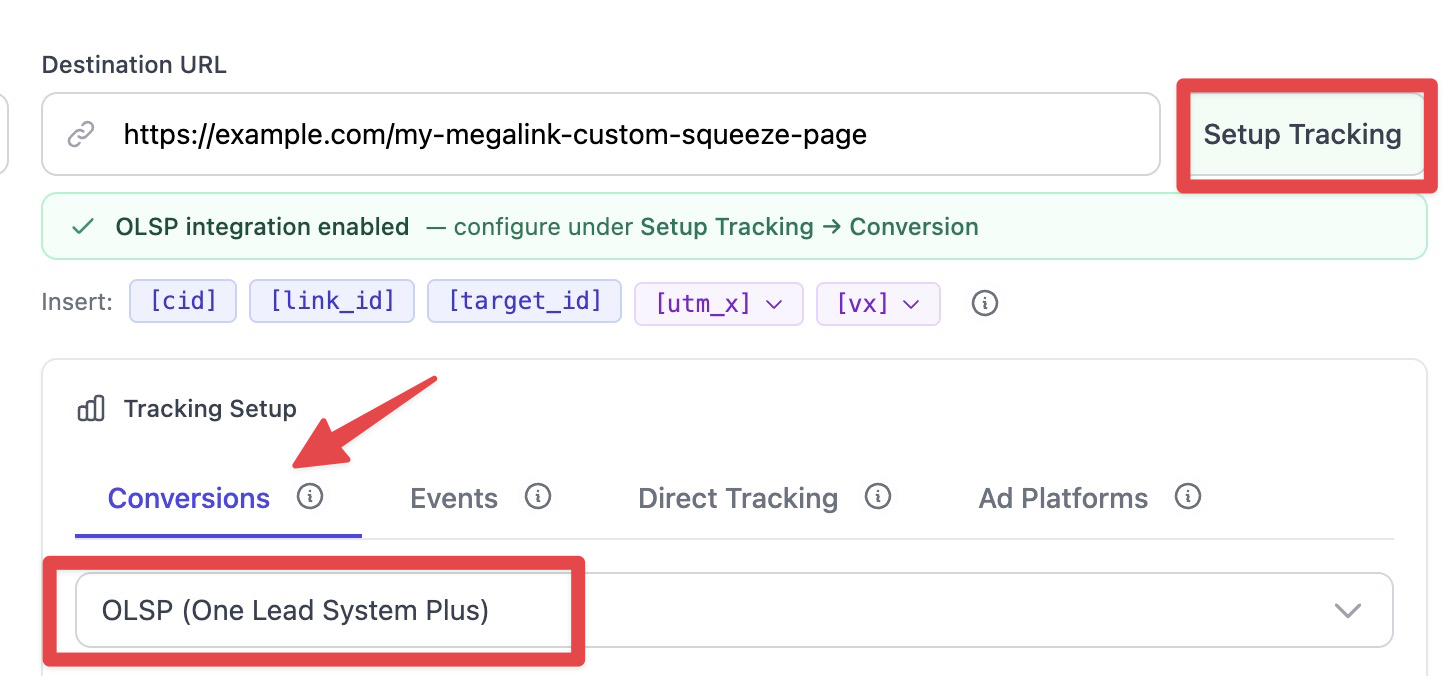
Everything for OLSP lives under that conversion source.
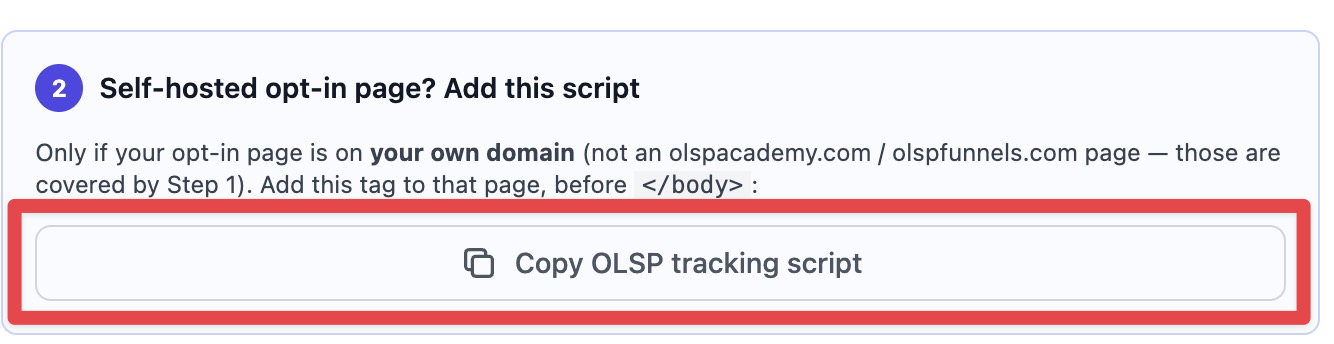
Self-hosted opt-in pages: add the script
If your opt-in page is on your own domain (not an olspacademy.com / olspfunnels.com page — those are already covered by Step 1), the OLSP conversion-source panel shows the exact script tag to add to that page, with a copy button. Paste it just before the closing </body> tag of your opt-in page. Pages hosted by OLSP need nothing.
What gets tracked
ClickerVolt fires the right event on the right page:
- Opt-in — when a visitor submits the email form on
olspacademy.com/get-megalink, anolspacademy.com/megalive/*page, or your own self-hosted opt-in page with the OLSP conversion source set. - Checkout View — when a visitor on an
olspfunnels.com/megalink-…-front-endpage clicks through to checkout. - Sale / conversion — not automatic. OLSP does not post the sale back to ClickerVolt. Attribute conversions in the Visitors screen using manual attribution.
Opt-in and checkout-view events appear in your link stats like any other ClickerVolt custom event — same attribution, same filters.
(Optional) Customizing custom event numbers
By default ClickerVolt reports opt-ins under Event 1 and checkout views under Event 2. To use different slots — for example so OLSP opt-ins aggregate alongside other funnels — change them under the OLSP conversion source:
- Open Setup Tracking → Conversion and make sure OLSP is the selected source.
- Pick the number you want from the Opt-in event dropdown.
- Pick the number you want from the Checkout view event dropdown.
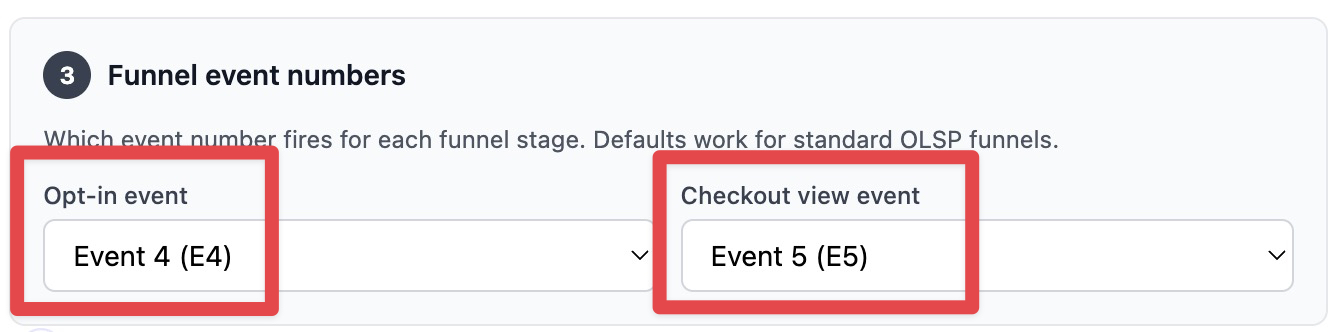
These are saved with the target as part of its conversion settings.
Verify it's working
After you save the target, send yourself a test click and walk the funnel:
- Click your ClickerVolt link.
- Submit the OLSP (or your self-hosted) opt-in form. Within a few seconds the click should show an opt-in event in your link's stats.
- Click through to the checkout page. A checkout-view event should appear.
- Complete (or simulate) the purchase, then open the Visitors screen and attribute the sale to that visitor — OLSP sales are reconciled by buyer email addresses here, not auto-tracked.
If opt-in/checkout-view don't show up, the most common cause is that Step 1 was missed — re-check the OLSP integrations page and confirm ClickerVolt shows Connected with your correct username. The next most common cause: the conversion source isn't set to OLSP on the target (check the OLSP integration enabled badge under the URL), or — for a self-hosted page — the script tag wasn't added.
What's next
Want to fan OLSP traffic across multiple offers and rotate by weight, geo, or device? See Adding Targets to Your Links and Target Weight and Traffic Distribution to combine OLSP with other targets on the same link. For reconciling sales, see the Visitors screen and manual attribution.