Custom Event Tracking
ClickerVolt provides 10 custom event tracking slots (Events 1-10) that allow you to track multiple conversion points beyond the main conversion. Use these to measure micro-conversions, funnel steps, or different types of actions within your marketing funnel. Two tracking methods are available: JavaScript (for browser-side events) and S2S Postback (for server-side events).
What Are Custom Events?
Custom events are additional tracking points you can configure on your tracking links. While the main conversion tracks your primary goal (like a sale or opt-in), custom events let you track secondary actions like:
- Free trial signups (Event 1) and paid upgrades (Event 2)
- Engagement metrics like video views, downloads, or demo requests
- Multi-step funnel progression (lead → call booked → sale)
- Different product purchases on the same campaign
- Upsells and cross-sells in your funnel
How to Track Custom Events
Custom event tracking is configured at the target level. Two methods are available depending on where the events occur:
Method 1: JavaScript Custom Event Tracking
Use JavaScript tracking when custom events occur in the browser (button clicks, scroll depth, video views, form submissions, etc.).
Setup Steps:
- Open your link in the editor
- Add or edit a target
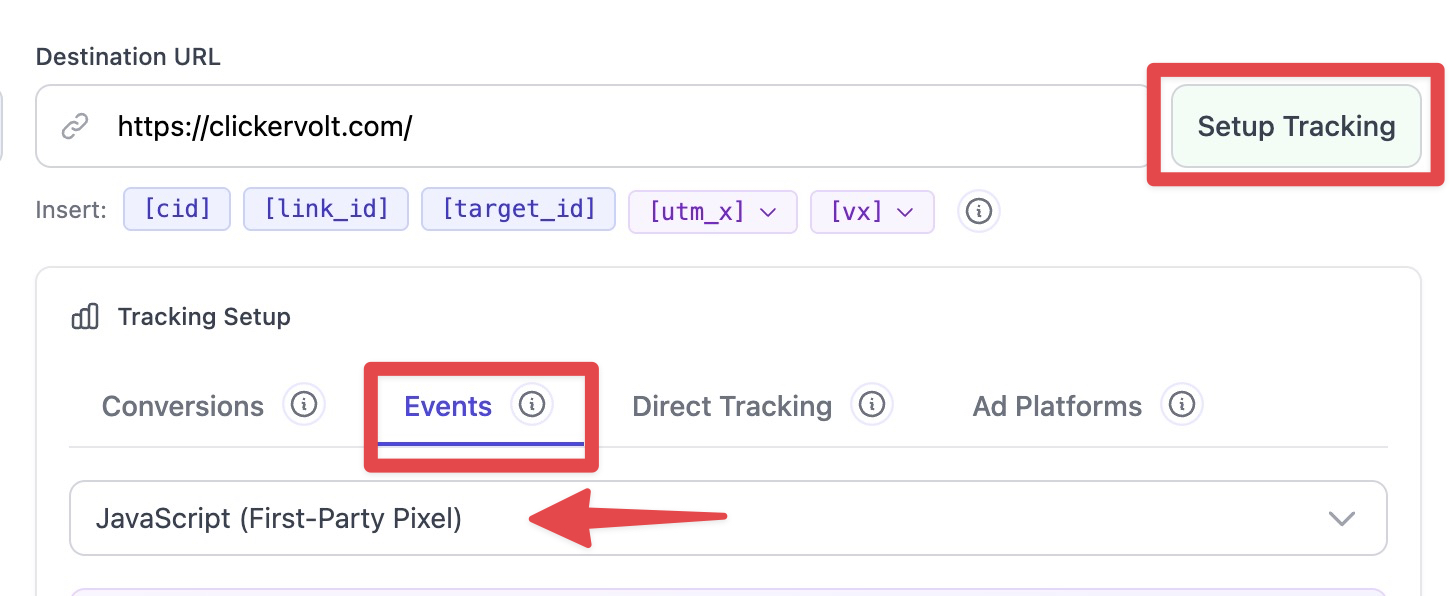
- Click the "Setup Tracking" button next to the target URL
- Select the "Custom Events" tab
- Choose "JavaScript (First-Party Pixel)" as the tracking method
- Copy the Universal Tracking Script and add it to ALL pages of your funnel
- Copy the Custom Event Tracking Function and add it to the SAME pages (after the Universal Script)
- Use cvEvent(targetId, N) in your JavaScript code to fire custom events manually, or use the code generator for automatic triggers
Manual Custom Event Triggering:
Call the cvEvent() function in your JavaScript code to track custom events:
- cvEvent('YOUR_TARGET_ID', 1) - Tracks Event 1
- cvEvent('YOUR_TARGET_ID', 2) - Tracks Event 2
- ... up to cvEvent('YOUR_TARGET_ID', 10) - Tracks Event 10
Important: The targetId is a unique identifier for your target. You can find it in your target settings. This parameter is required because it allows ClickerVolt to support multiple targets on the same page.

Tip: Store your targetId in a variable for cleaner code:
var targetId = 'YOUR_TARGET_ID'; cvEvent(targetId, 1); cvEvent(targetId, 2);
Examples:
- Track button click: onclick="cvEvent('YOUR_TARGET_ID', 1)"
- Track form submission: document.getElementById(''myForm'').addEventListener(''submit'', () => cvEvent('YOUR_TARGET_ID', 2))
- Track video completion: video.addEventListener(''ended'', () => cvEvent('YOUR_TARGET_ID', 3))
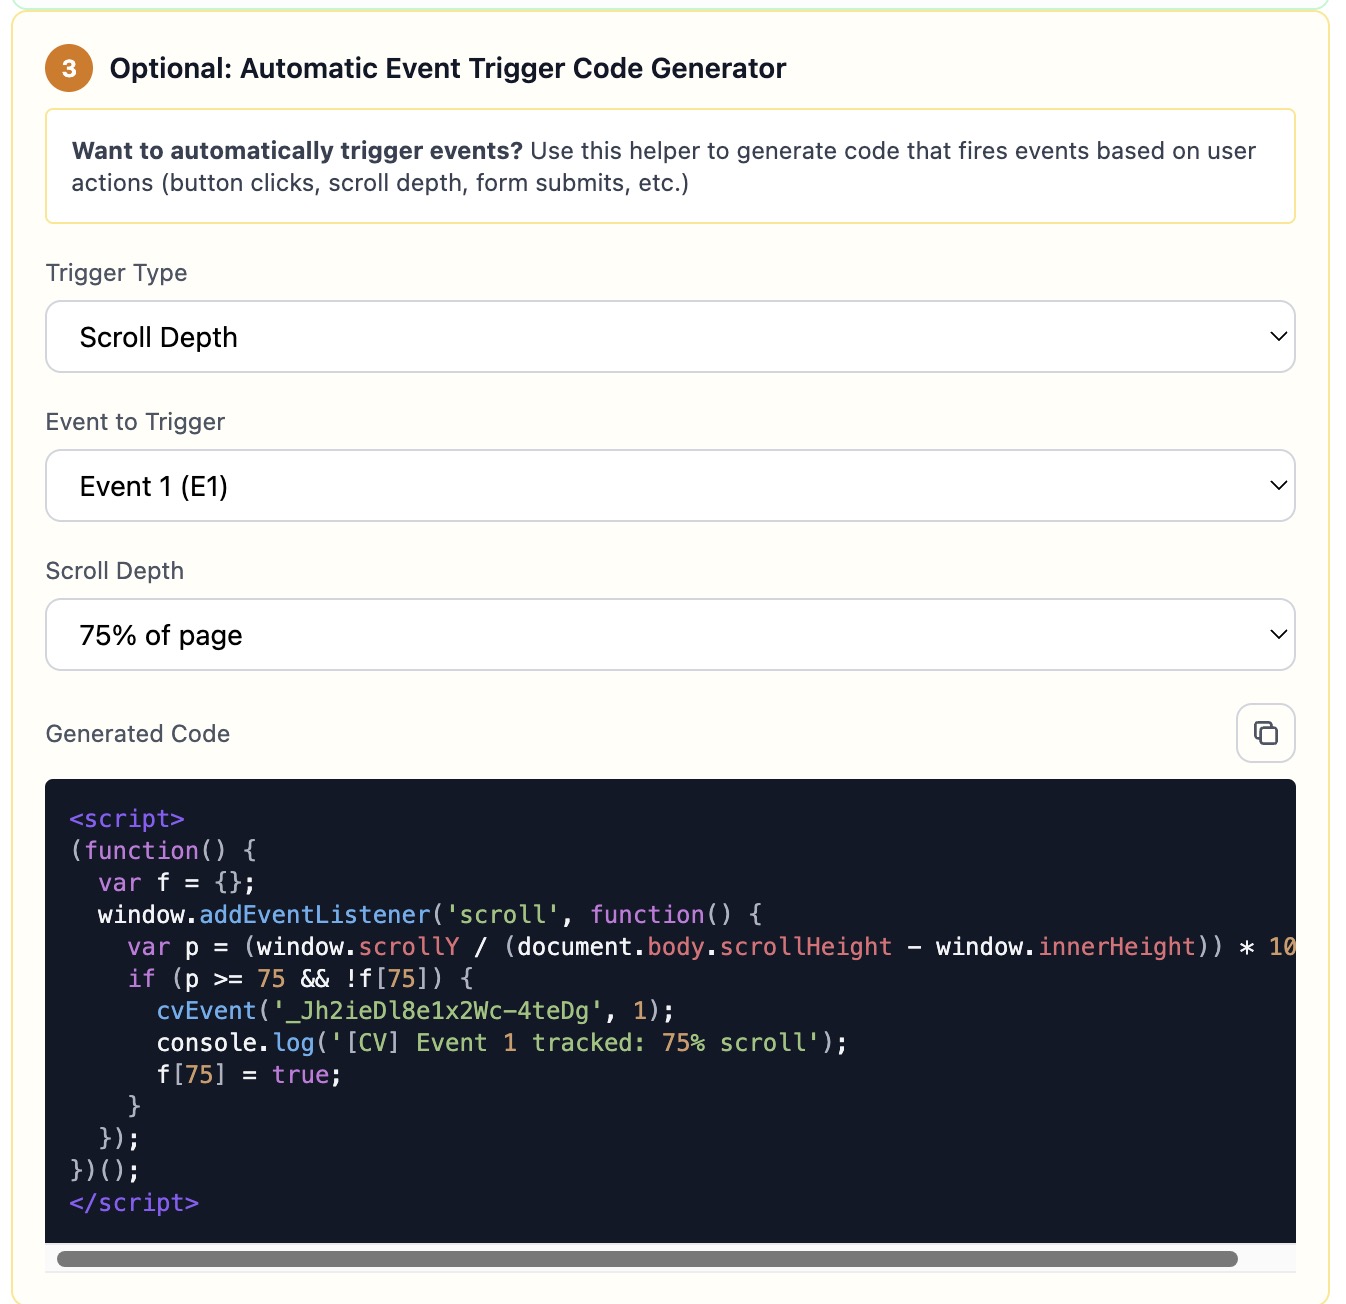
Automatic Custom Event Triggering:
Use the optional code generator to automatically track custom events based on triggers:
- Page View - Fire custom event when page loads
- Button/Link Click - Fire custom event when specific element is clicked
- Form Submit - Fire custom event when form is submitted
- Time Delay - Fire custom event after X seconds
- Scroll Depth - Fire custom event when user scrolls X%
- Element Visibility - Fire custom event when element appears in viewport
- Exit Intent - Fire custom event when user moves cursor to leave page
- Input Focus - Fire custom event when form field is focused
The code generator creates ready-to-use code snippets for each trigger type.
Method 2: S2S Postback Custom Event Tracking
Use S2S postback when custom events occur on your server or external platform (payment processing, webhook triggers, email opens, subscription events, etc.).
Setup Steps:
- Open your link in the editor
- Add or edit a target
- Click the "Setup Tracking" button next to the target URL
- Select the "Custom Events" tab
- Choose "Server-to-Server (S2S Postback)" as the tracking method
- Copy the Custom Event Postback URL
- Call this URL from your server with cid (click ID) and event (custom event number) parameters
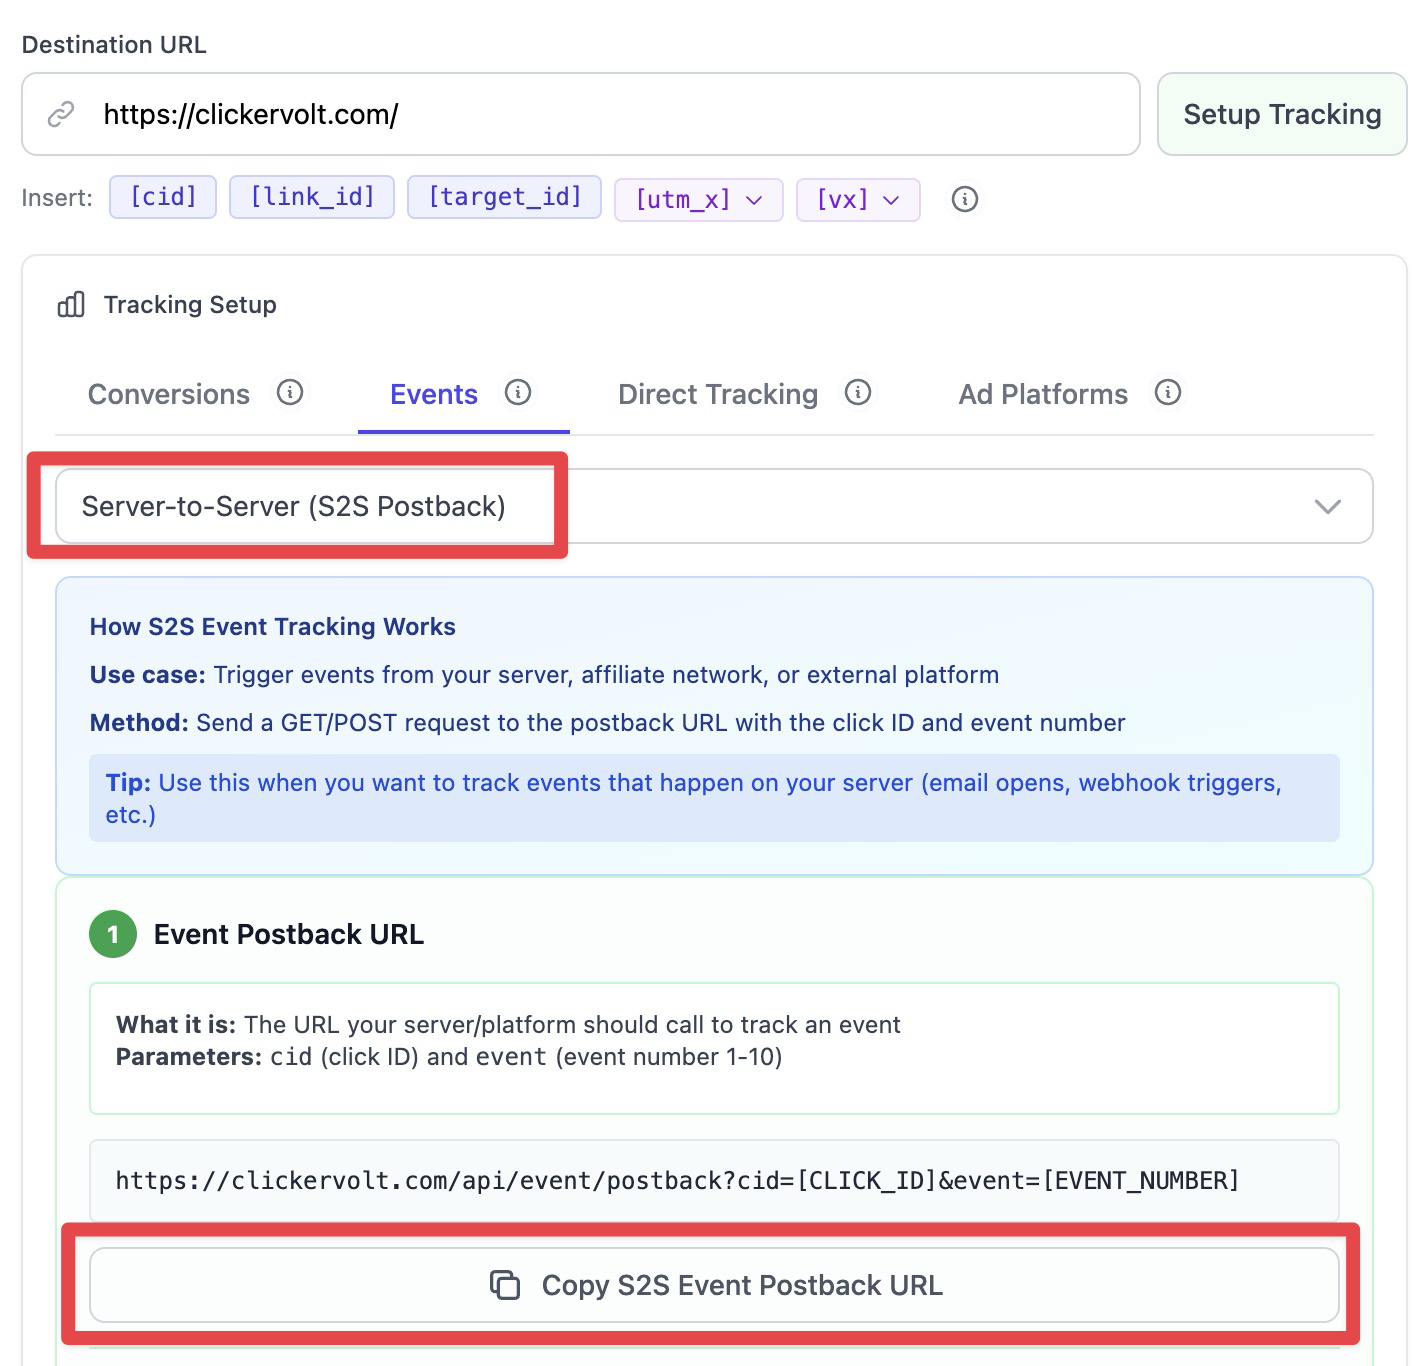
Postback URL Format:
https://clickervolt.com/api/event/postback?cid=CLICK_ID&event=N
Parameters:
- cid - The click ID from the visitor (passed in your tracking link URL as ?cid=[cid]...)
- event - Custom event number from 1 to 10
Example:
- Track Event 1: GET https://clickervolt.com/api/event/postback?cid=abc123&event=1
- Track Event 2: GET https://clickervolt.com/api/event/postback?cid=abc123&event=2
- From cURL: curl "https://clickervolt.com/api/event/postback?cid=abc123&event=1"
Common Use Cases
Lead Funnel Tracking
- Main conversion: Email opt-in
- Event 1: Booked call or demo
- Event 2: Became customer
E-commerce with Upsells
- Main conversion: Frontend product purchase
- Event 1: Upsell 1 accepted
- Event 2: Upsell 2 accepted
- Event 3: Order bump added
SaaS Trial to Paid
- Main conversion: Free trial signup
- Event 1: Completed onboarding
- Event 2: Upgraded to paid plan
- Event 3: Annual subscription
Content Engagement
- Main conversion: Page visit
- Event 1: Video watched 50%
- Event 2: Downloaded resource
- Event 3: Clicked CTA button
Viewing Custom Event Data
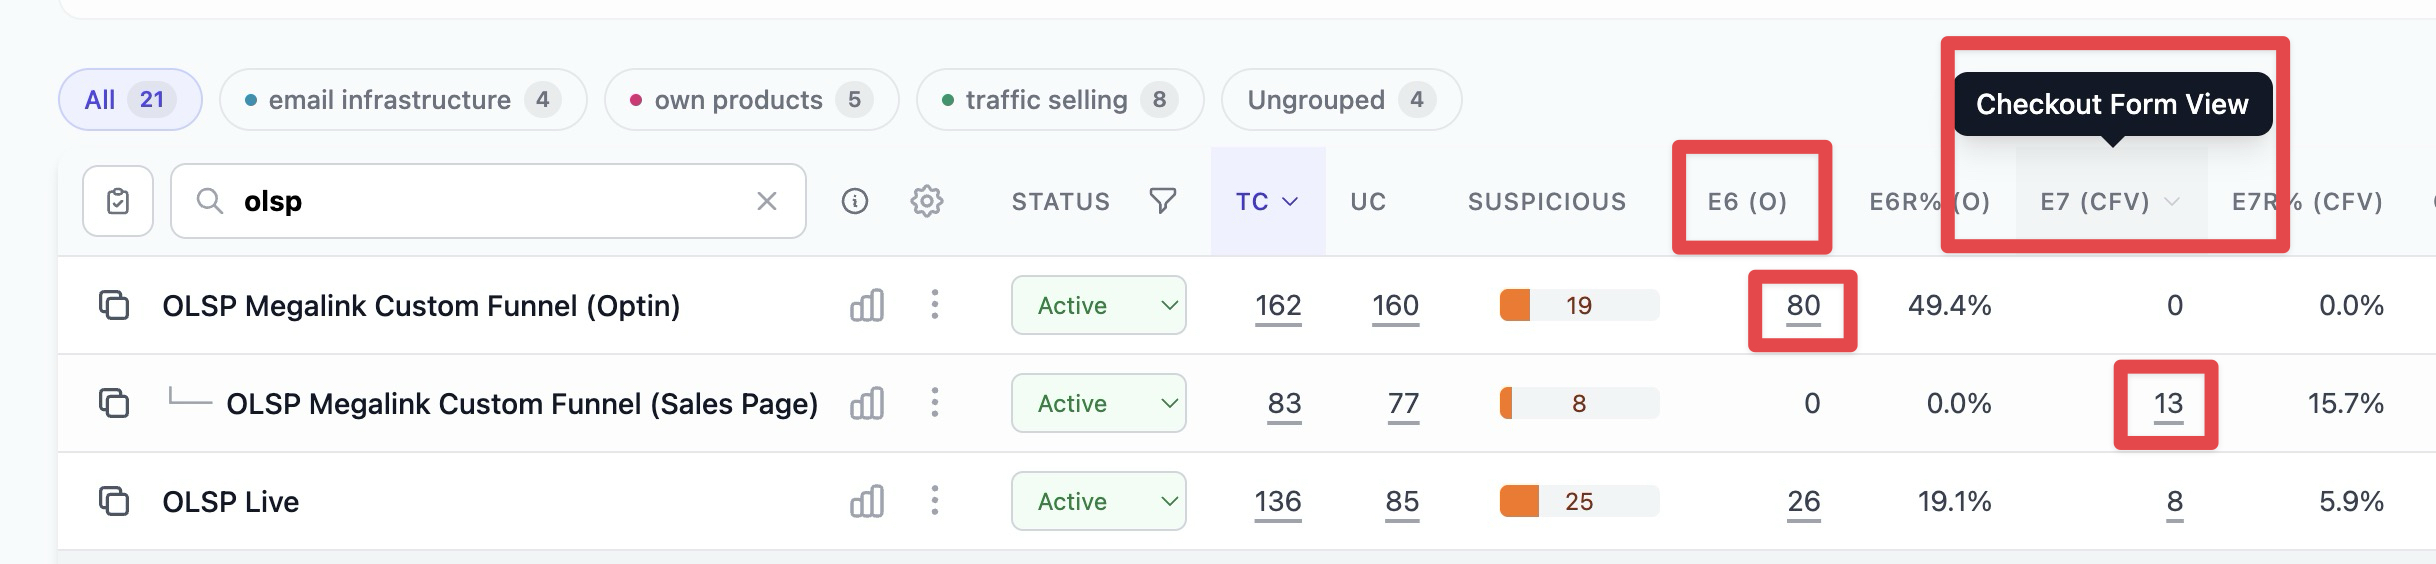
Custom event data appears in your statistics table as separate columns (E1, E2, ... E10). If you''ve configured custom names, they''ll appear as "Custom Name (E1)". The table also shows a "Total Custom Events" column summing all custom event counts.
Filter and sort by any custom event to see which traffic sources and campaigns drive the most valuable actions. Custom event columns can be toggled on/off in the column visibility settings.
Note: Custom events do not track revenue separately - they only count occurrences. Use the main conversion tracking to track revenue per sale.
Advanced Topics
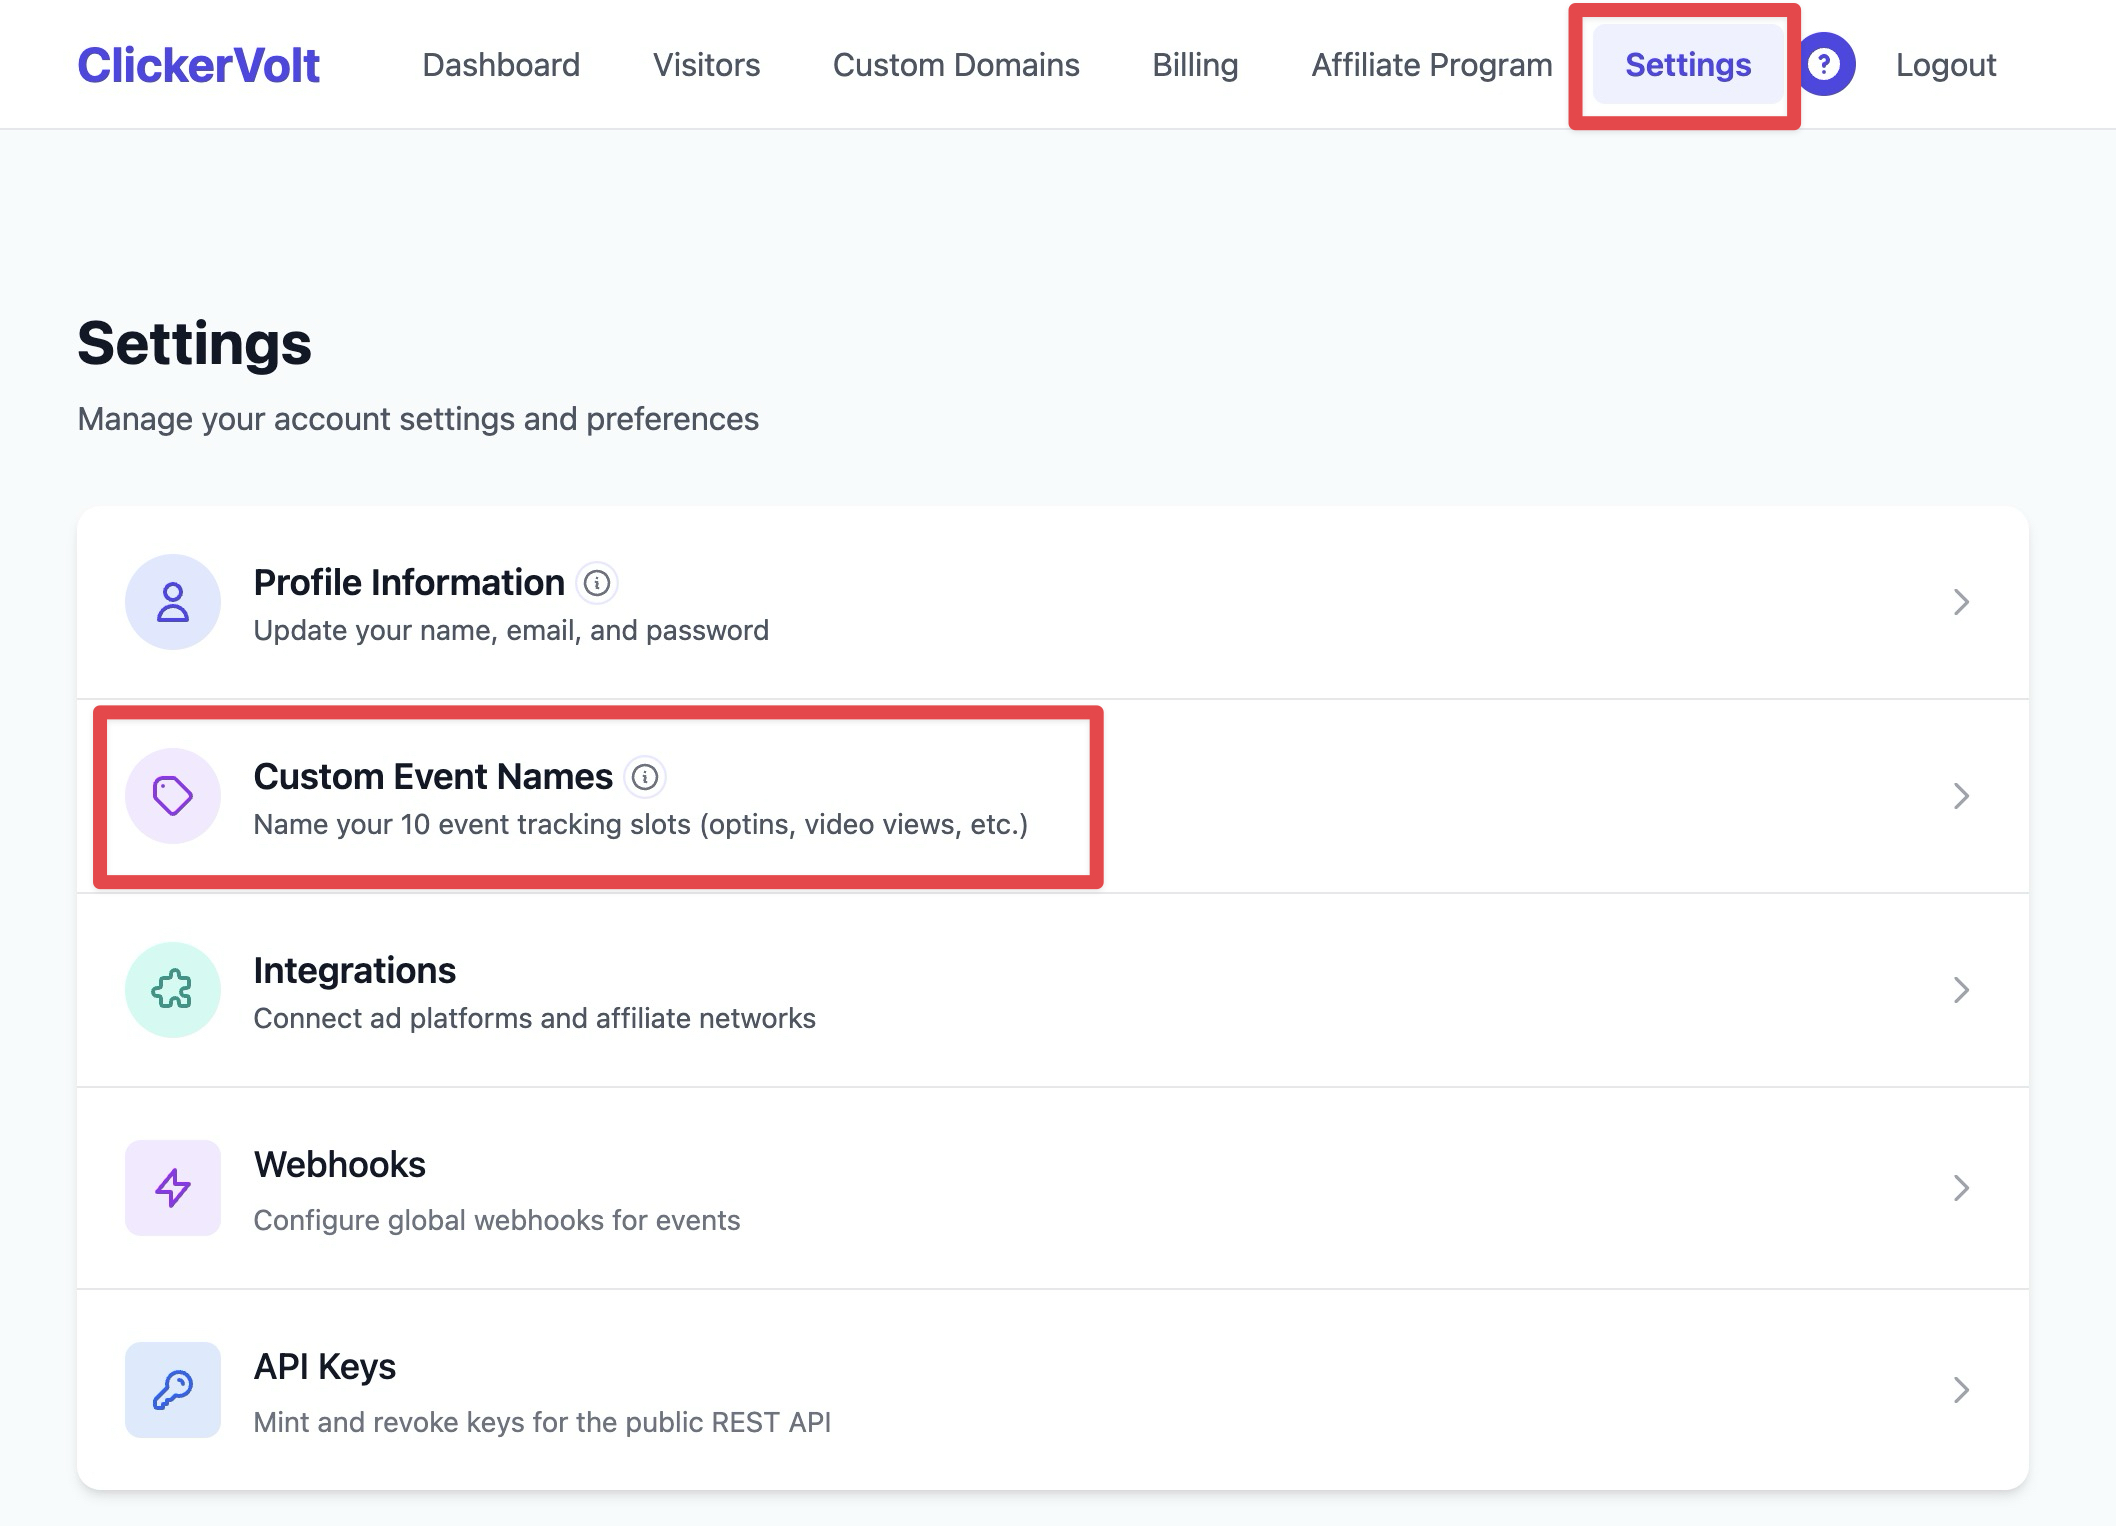
Custom Event Naming (Optional)
Custom event names are user-specific and configured in your account settings. For example, you might name "Event 1" as "Free Trial" and "Event 2" as "Paid Upgrade". These custom names will appear throughout your statistics and make reporting easier. If you don''t set custom names, events default to "Event 1", "Event 2", etc.
Custom Events and Rotation Algorithms
Custom events do not trigger target rotation or funnel progression. Only the main conversion affects rotation algorithms like Progressive Exposure. Use main conversions for actions that should advance visitors to the next target.
Custom Event Attribution
Custom events are attributed to the visitor''s most recent click, just like main conversions. If a visitor clicks multiple times, all custom events are attributed to their latest click. There is no time limit - custom events can be tracked days or weeks after the original click.
Custom Event Deduplication
A single visitor can trigger multiple different custom events (Event 1, Event 2, etc.), but triggering the same custom event multiple times only counts once per visitor. For example, if a visitor calls cvEvent('YOUR_TARGET_ID', 1) three times, only one Event 1 conversion is recorded.
Custom Event Naming Strategy
Custom event names are account-wide, not link-specific. Choose clear, descriptive names that make sense across all your campaigns. For example, always use Event 1 for "Free Trial" and Event 2 for "Paid Upgrade" across all SaaS campaigns for consistent reporting.
JavaScript vs S2S Postback
Choose JavaScript tracking for browser-side custom events (clicks, scrolls, video views) where you need real-time tracking in the visitor''s browser. Choose S2S postback for server-side custom events (subscription renewals, webhook triggers, email opens) where the custom event occurs on your server or external platform.